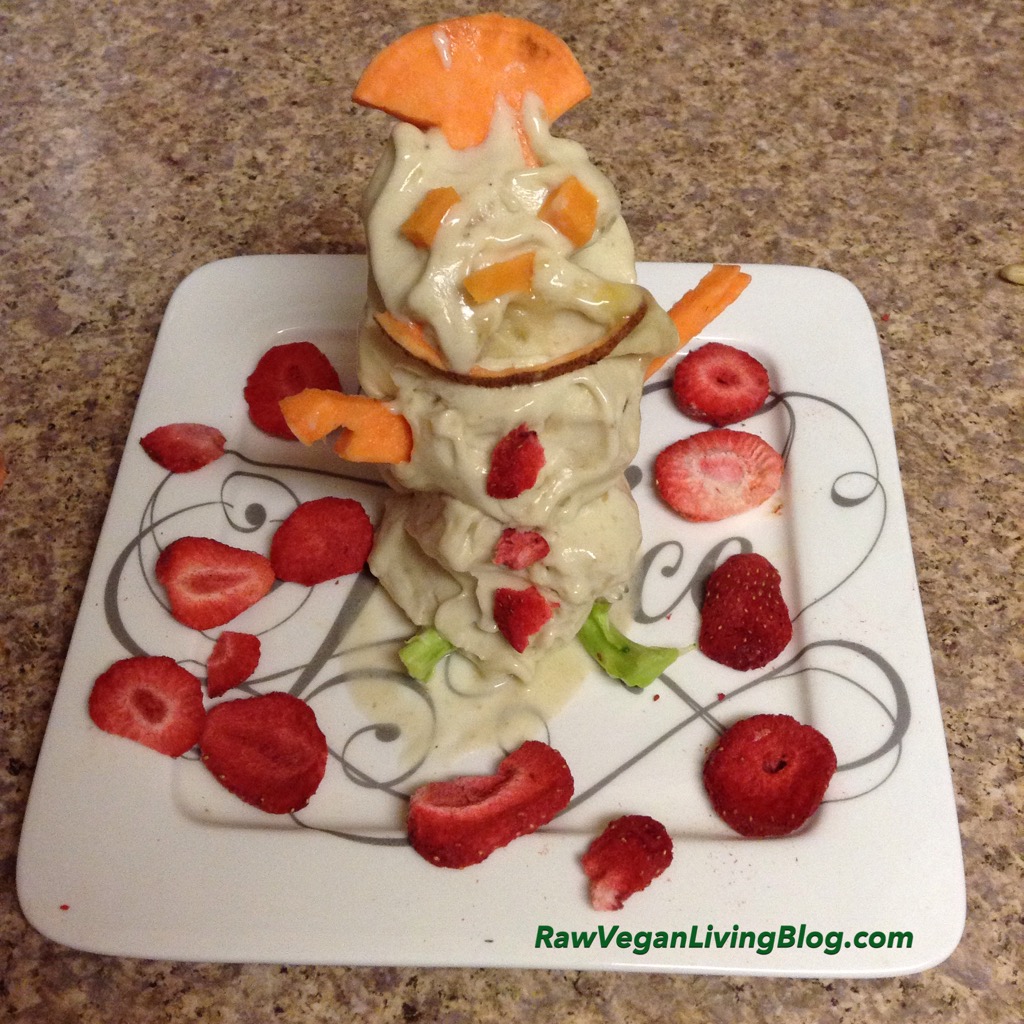
Christmas is here once again, and about two weeks ago, I was feeling really inspired and Christmassy in the kitchen one morning. I thought it would be cute to make a snowman out of banana ice cream, and decorate it with fruits and share it. Although this may not look like the most happy looking snowman (or shall I say, perfect) but the creation/idea turned like like I had imagined 🙂
Since today is Christmas, I thought I would share this recipe for those looking for creative and fun recipes to make during the holidays. This is the perfect recipe to make with children, as its fun, easy and super quick! Feel free to decorate your snowman as you wish, and have fun and be creative. Remember, you don’t have to go by the exact colors of the snowman; you can make him any color, any flavor ;)! I used broccoli for the feet, sweet potato for the arms, nose, hat and eyes! Oh, be sure to eat him quick (or freeze him if you’re not planning on eating it right away) because he’ll melt fast!
This recipe is so easy and pretty self-explanatory, I don’t even need to write out the directions step by step! Just layer 3 ice cream scoops on top of each other (just like you would build a snow-man made out of snow!) and decorate it as you wish! But since the ice cream making part is CRUCIAL, I’ve wrote it out below.
Here’s How To Build The Fruity Banana Ice Cream Snowman
What you’ll need:
- frozen bananas for the ice cream
- sweet potato, for the hat, eyes, nose, and arms (i used the skin/peel of the sweet potato and used it as a scarf!)
- dried strawberries or any dried fruit or fresh fruit you wish
Note: blueberries or blackberries make great eyes and buttons!
Start by preparing all your decorations by cutting and shaping (if necessary) an set your decorations aside. have your children help you choose to how decorate it, and have everyone decorate their own! You could even great a big snowman and have the entire family join in and decorate it and eat it together!
- Make the ice cream by blending frozen bananas (if you don’t have a high speed blender or are sing a food processor, you MAY need to add a splash of water. Not too much though, as your ice cream will melt!) until ALMOST creamy and smooth. It’s OK if your ice cream is chunky, as this will help built the snowman.
- Make the ice cream by blending frozen bananas in a high speed blender or food processor (you may need to add a splash of water if necessary, depending on how frozen and which appliance you are using to blend. If necessary, add in a tiny bit of water to help make the blending process easier) until ALMOST creamy and smooth, but chunky and thick (Chunky ice cream will make building the snowman much more easier).
- Layer 3 scoops of banana ice cream on top of each other onto a plate and decorate it as you wish. Enjoy!
Tip: if you’re not going to eat your fruity snowman quickly, then place it in the freezer until you’re ready to eat it. Freezing it will help with the formation of your snowman. Plus, she melts pretty fast, so eat her quick! 😉
If you make this fruity banana ice cream snowman, please tag me on Instagram @officialrawveganliving and/or @milianybonet! I’d love to see your creations! And if you don’t have instagram, share with me on Facebook or Twitter. And if you don’t have social media and make this, please email me at miliany@rawveganlivingblog.com a picture of your creation pic!
Merry Christmas! xxoxox
Miliany
guilt free, healthy, vegan, delicious, vegan breakfast, raw vegan living, vegan living, raw vegan teen, vegan teen, vegan teenager, raw vegan teenager, vegan meal, vegan recipe, vegan living recipe, sugar free, dairy free, fat free, high carb low fat, high carb, hclf, vegan, sweet potato ice cream snowman, cruelty free, snowman, banana ice cream snowman, christmas treat, raw vegan christmas ideas, raw vegan christmas treats, raw vegan christmas recipes, dairy free, sugar free, lactose free ice cream, banana ice cream, guilt free banana ice cream, dairy free banana ice cream, sugar free banana ice cream, banana nice cream, banana whip, raw vegan, raw food, raw foods, raw vegan living, raw vegan living blog, raw vegan recipe, raw vegan recipes, raw food blog, raw food website, raw vegan blog recipes, raw foods blogger, raw vegan blogger, raw foods chef, raw vegan chef, healthy plant based recipes, healthy plant based recipe, plant based, plant based recipe, plant based recipes, guilt free recipes, sugar free recipes, healthy recipes for healthy living, radiant recipes for healthy living, plant based vegan recipes, plant based raw vegan recipes, plant based vegan blog, plant based raw vegan blog, fully raw, fully raw vegan blog, fully raw blog, fully raw vegans, raw foods lifestyle, raw vegan lifestyle, plant based lifestyle, raw vegan lifestyle recipes, vegan living, healthy vegan recipes, vegan blogger, vegan website, dairy free recipes, sugar free recipes, go vegan, going vegan recipes, transitioning to raw, transition to raw, transitioning to raw recipes, transition to raw recipes, staying raw recipes, staying raw recipe, staying vegan, staying vegan recipes, staying vegan blog, staying raw, staying raw vegan recipes, staying raw blog, transitioning to raw blog, raw vegan bloggers, plant based vegan blogger, vegan living, vegan living blog, vegan living recipes, dairy free vegan recipe, dairy free vegan, dairy free vegan, no meat, no dairy, no dairy recipes, no sugar free, fullyraw, fullyraw vegan dessert recipes, healthy indulgence recipe, healthy indulgence recipes, raw food recipes for busy people, simple vegan recipe, simple vegan recipes, vegan diet, vegan lifestyle, simple raw food recipes, simple raw food recipe, raw vegan simple recipes, simple raw vegan recipes, easy quick raw food recipe, easy quick raw vegan recipes, fast and easy vegan recipes, raw living foods, raw living foods recipe, real raw food, raw living foods, raw living, going raw recipes,


Leave a Reply